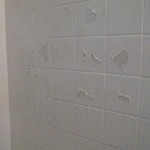
A bathtub that is chipping paint is not a good thing. Structurally the tub is sound, but its outward appearance is screaming for a makeover. If only chipped paint tasted like popcorn and weren’t somewhat of a hazard then there would be no problem. However, in reality, chipped paint exposes the surface which can then honestly degrade the quality of the tub.
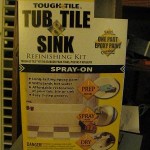
You have two choices: 1. Replace the tub or 2. Refinish the tub. Replacing the tub will cost around $900 and refinishing the tub will cost around $400. They also sell a kit for $45 that allows you to refinish the tub yourself, but should you?
How you answer that question depends how you would answer the following two questions. Do you have the money to replace the tub? Have you ever been a gang member?

I’ve never been a gang member and we didn’t really have the money to replace the tub. But I’ve played pretend craps enough times to know that a 10% chance at saving 90% is worth taking, so the DIY refinishing kit was purchased.
I asked the guy at the home improvement store if this product really worked. He took a deep breath and said, ‘if you follow the directions very carefully, yes’. That breath was a telling sign and not because he had asthma, it told me that I had to be very careful and wear a respirator.

The tiles in the shower were peeling and there were four patches on the tub that also needed work. The kit said to clean the area, dry the area, scrub the area with #1 steel wool, dry the area again and repeat all of that three times. It was my own Mr. Miyagi, except instead of saying wax on wax off, it was saying ‘save $360, save $360’.

Each cycle of cleaning and scrubbing took about 50 minutes. At the end of this cleaning and scrubbing cycle I tapped off the area and proceeded to spray. As per the directions I went outside and sprayed a test area first to ‘test my technique’. On the cardboard outside my technique was strong.
However, on the actual bathtub inside my technique was weak. I gave the area two coats of this super duper water resistant paint but the areas that were peeled back still had rough edges. The finished product looked OK and probably wouldn’t cause anybody cancer, but in the end we sought the expertise of a professional.
My wife should rejoice because I have no danger of becoming a gang member. The city streets of Atlanta, although already replete with gang graffiti, will not have my runny paint stream sullying their good gang name.
In the end it was a $45 gamble that I knew was questionable from the get go. If you have peeling in your bathtub don’t monkey around with it, call a refinisher or get it replaced as this one was too much of a technical challenge for dad.
As a stay at home dad I miss having the spare time to fix things. Even though the child is my full time job, things still break or need a fix in the house. Sometimes the repair will be something that I can easily complete and other times it’s a repair that I simply should’ve paid to have it done. Regardless, I’ll write it up here in hopes that you may be able to gauge what you can do and when you need to call in for help. The series is called, DIY a Stay at Home Dad Can Do, but in some cases, you shouldn’t, because of difficulty, time involved or money. All dads aren’t equal. If you wear your do-rag barely over your eyes and tag buildings, then bypass this series and go straight to the fart jokes, which should be in the next column.


 Facebook
 Twitter
 Flickr
 GooglePlus
 Youtube
One thought on “DIY a SAHD can do-refinish a tub, tile or sink”
Comments are closed.